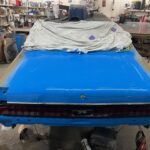
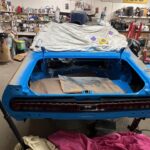
Let me tell you what I have learned from many builds in my past. If you don’t push yourself to try different techniques and products to end up with a better result, you will stay stagnant and rely on mediocracy…..and then wonder if it could have been better. I am always pushing this envelope but sometimes the piper must be paid. This past week I was not batting near 500. In fact, as my dad would remind me, “You’re not even hitting 185, but you may still help win the game if you get hit with the ball and walk the base…several times this game!” I tried something different that punished me and cost me time and money to solve. Normally when I spray the clear via aerosol I use two main coats with an initial coat that is basically a dust coat. This dust coat allows the surface to get hit lightly with clear to create a sticky surface to hold the next coat which will be a heavier coat. This time for my outside pieces I chose to use three coats. Everything looked good. Everything felt dry on the surface, but the underlying clear was not hardening like the outer surface. Why did this happen? I haven’t experimented with three coats before especially spraying during cold temperatures. This I believe was the first problem. The room should be at least 70 degrees and I was likely about 65 degrees. When I spray panels I place a high volume carpet fan underneath the garage door to exit the overspray . As it clears the room air cold air comes rushing in beside the fan as fast as it goes out. This cools the room off considerably. I only run the fan for five minutes but now I have to rely on the furnace to warm the room up again to get ready for the next coat after the first coat flashes off. This I believe was a big part of the problem. The next coat went on over the soft unhardened first coat and I just carried on. Now I have a thicker coat when finished but it hasn’t properly flashed off and now is soft. What does this cause? I left this trunk lid for a week and a half before working on the inside trunk lid installing new weatherstripping. I had to place the trunk lid on a windshield stand to support it. This stand has foam around where the bars are supporting the item placed on it. I placed towels over the foam since the foam has seen better days and is covered with old primer and paint and what not. The towels should be soft to protect the new paint on the outside of the trunk lid. The weight of the trunk lid pushing down on the towels imprinted the towel pattern into the clear. I have seen this happen to clear when it is a day old but not after a week and a half of drying. In a perfect world I would have a heated booth to bake this product or at least heat lights. They do make heat lights on a rolling stand…..but I am not a body shop nor am I a professional paint shop. I have never had to contend with this until now. I try to spray my cars in spring and fall to avoid tree fluff and what not from being sucked into the shop when the fan is on. In the middle of winter I have sprayed cars but never more than than two coats of clear. I have read and heard from guys bragging how many coats of clear their car had making more depth to the paint. The flattest job is less coats, in my world. More coats means more chances for a fly to moon walk over top of your newly sprayed surface. More coats means more chances of a sag or a run or better yet ORANGE PEEL! Orange peel is a common problem with spraying different types of paints. I haven’t had too much problem with this phenomena but again I am only spraying two coats and will only spray two coats from now on. How do I fix this on my trunk lid? I will tell you when I succeed but here is what I have tried so far. I block wet sanded the rough texture out of the clear surface with 1500 grit wet sand paper and then I applied 2000 grit. As I started to polish I noted how hard it was to polish the clear to a perfect shine. There were scratches in the surface. It was reminiscent to catching a grain of sand under the sand paper when sanding. I think the clear I was sanding was bunching up on the wet sand paper creating a lump that was dragged across the surface when sanding creating scratches. I used a more aggressive pad and polishing liquid on my polisher. It seemed to work until I burned through the clear to the primer on a curved section on the back facing part of the trunk lid. It was the part that you see when you come up to the back of the car. It was the part that would stand out like a sore thumb, and it happened so fast! Now I would have to dust in some more base coat lightly and then re clear that section and hopefully wet sand and polish it out. The base coat went on fine but the clear was not so happy as it was reacting to the old clear that was still gassing off from being so soft. Now there is a bit of a reaction on the second splash of clear. I am hoping to let it dry and sand and polish. Now I know what likely will have to happen but I am still dealing with soft clear that I hope will dry over time. I will have to re wet sand the whole panel with 400 -600 grit and re clear one final coat. OH yay!
Let me take this time to create a side note about this whole process of polishing clear coat. There are two main types of polishers and they each work differently but get to the same result. I usually use a polisher that spins the pad in a circle at a speed chosen by the user. It is faster and usually I can use this machine without causing damage from overheating the material and burning through. The second type of polisher is a D/A sander or dual action. This type of movement on the polisher is safer to use but takes considerable more time to get to the final result. This is what I have found. As you polish you move from an aggressive textured pad and a more gritty cutting liquid to do the work of cutting the clear flat. Commonly there are three steps but some guys add a couple more going softer and softer in the pad and thinner and less gritty in the compound. Too many for me. Three is enough and two is usually good enough unless you are going to an indoor car show under ugly lights. Knowing the clear on my trunk lid was suspect I should have used the D/A polisher but pride gets in the way and I would rather be a Big Boy Hero and use the faster polisher raising the risk and stakes. Congratulations to me. Now I am out a bunch of product, a bunch of work and mental anguish. I guess I should have taken one for the team and got hit by the ball and take my base!
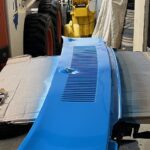
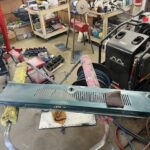
Below I included some photos of other pieces I sprayed including the cowl. This piece I was spraying and did not have enough clear in the can for a third coat so I left it at two coats (I got lucky there). I also sprayed the inside water gutters surrounding the trunk and the piece that extends towards the back glass. It did not have to be perfect all the way to the glass since a large portion will be covered in my bed liner vinyl top.