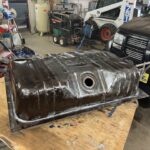
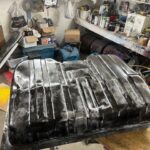
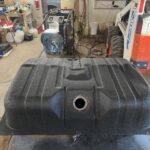
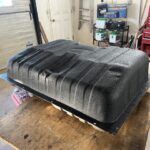
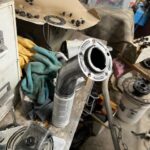
So while I am waiting for my engine parts I decided to clear out the trunk area, vacuum all the debris and eventually take the gas tank out. The sending unit was tested and still seemed to work according to my multimeter, but it was taken apart and contact wires cleaned. Fuel over the years leaves a white film over everything. There was no fuel in the tank and it looked relatively clean. Bad fuel is so smelly…..like bad turpentine and it is also damaging to the inner tank and may or may not be saved. I used my heated pressure washer and washed the crap out of it. I mean there was no real crap in it but I ‘washed the crap out of it!” I sanded the half showing underneath the car, and used a metal converter sprty that acts like a primer and then rocker guarded with a shutz gun (photos below). I could have ordered a new tank with no dents and work needed but that costs at least $500 and not counting the shipping costs. I don’t care about dents on the bottom surface of a gas tank because it is rarely seen and even when up on a hoist a person needs to look closely to see smaller dents. It is nice to have the parts ready to install when needed. These jobs are tedious but need to be done. They take lots of time and patience but the little details are what counts in the end.
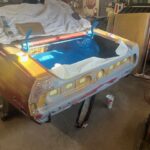
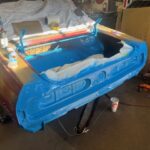
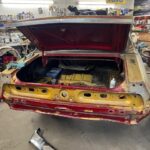
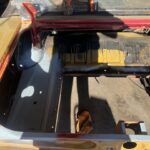
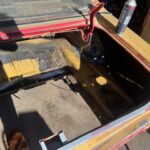
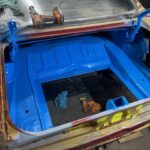
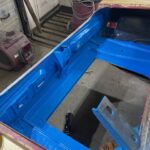
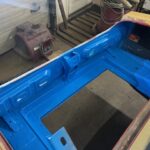
The inner trunk was not that rusty which is nice for a car from 1970. I had to remove the factory tar that becomes brittle from the surface. The whole inner area was sanded with either an etch pad or sand paper and bare metal was treated with a rust converter spray. The original color of this car is going to be changed to Grabber Blue so all parts needed to be prepped. I won’t lie about this job. It is a real back breaker. Gumby I no longer am and bending underneath the back window to sand was not fun. I blew out all of the residue and cleaned with glass cleaner (wax degreaser works as well). The tank was out of the car so I could set a rolling stool into the trunk area to at least save some of my back but eventually it was in the way and I needed to spray on my knees to get into all the areas requiring paint. This job took at least eight hours. Note the inner tail light panel was needing paint as well so the back bumper, tail lights, rear valance panel and gas filler door had to be removed. The next job would be painting the outer tail light panel so I sanded it as well now while no paint was applied. It took three cans of base coat to cover the areas requiring paint. I applied a light mist of paint and then two medium coats of blue. Don’t try to cover all the areas with a heavy coat as this can cause runs in the base coat. The light mist is used to create a sticky coat for the paint to stick to. I put two coats of clear over the base coat. These areas are rarely seeing sunlight and likely a trunk liner will be placed over top of the gas tank and trunk area. It is worth the effort to clean this area up visually and mentally. I also wire wheeled the gas tank filler neck and clear coated it. It is visible when the trunk is opened.
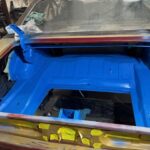
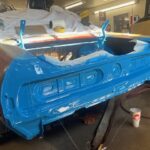
After a couple of days I masked the holes in the tail light panel from the inside this time so that I could spray the outer panel without blowing paint and clear into the freshly painted trunk area. This tail light panel for the most part will not be seen except around the gas filler door so I just used two coats of base and clear for it to be protected from the elements.
Next on my list of time consuming jobs is to restore the taillights and paint the outer structure black like a Cougar Eliminator has. This requires sand blasting which I do not enjoy. All sand blast cabinets that you can purchase for your shop that are not commercial grade are crap. They work for twenty seconds at a time before needing back pressured to blow the inlet tube out. I have a kick ass compressor so lack of air volume is not the problem. I have changed the sand material that I use to clean sand as the old sand gets pulverized and turns into a powder which might block the tube. Not sure….don’t know, do care but would rather swear at the cabinet while I work. The gloves that stick through the cabinet do not last long but cost almost as much as the cabinet. Dust particles come out of small holes in the gloves just enough to choke you while you swear. I will post photos once I get the moxy to attack this job. The red plastics have to be polished as well and this also takes patience and time on a polishing wheel. Too fast heats the plastic up too much making it into a rough fiberglass like material and wrecking the tail light surface. This takes practice and a polishing motor that can be speed controlled to keep the rpm down on the wheel.